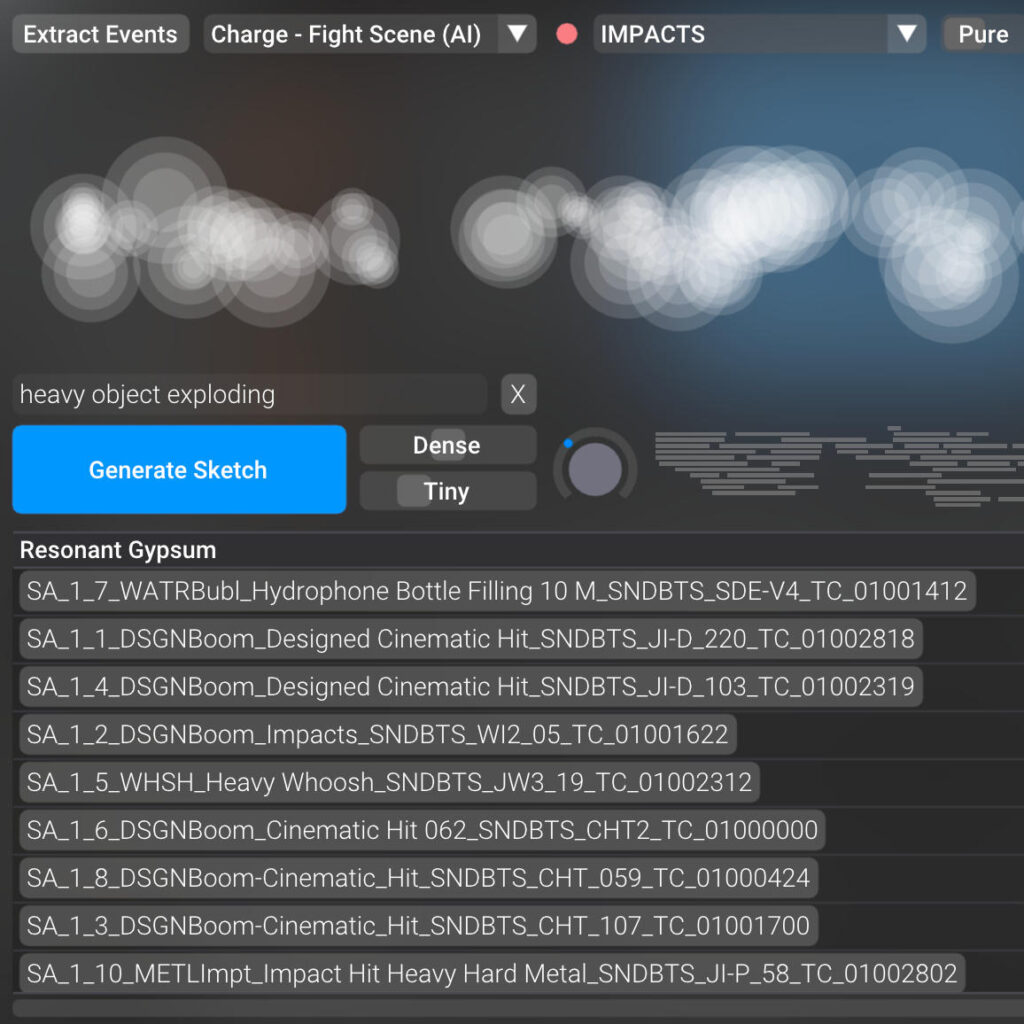
User Interface

1. Extract Events – Import events from video (.mov, .mp4) using AI video detection or load markers from Pro Tools Session Info (.txt) and Steinberg Nuendo Marker CSV (.csv)
2. Events selection – Select your extracted Events file. Right click to rename or delete. Choose [Blank Slate] mode.
3. Sound Pool – indicates the percentage of how much a sound effects pool is filled matching the defined criteria (based on weight and text prompt input).
4. Materials selection – Your imported sound effects libraries as well as the built-in [Fundamentals] library can be selected here.
5. Mode Switch – Select sound generation mode. The algorithm will trim, fade and timestamp selections from your original audio in Pure mode. Breed new sounds through transmutation in Alloy mode.
6. Setup Button – Import sounds, apply effects, adjust project parameters and smart management options.
7. Help – About information as well as the quick start guide can be found here.
8. Text Prompt – Type in a short scene description or enter a few keywords to narrow down your selection.
9. Generate Sketch – Clicking this button will match, trim, fade, synchronize and timestamp audio to picture and produce a foundational sketch for you to build upon. Press Esc on your keyboard to cancel sketch generation.
10. Length – Set sound duration. The algorithm is more likely to pick up shorter sounds such as hits and impacts or longer ones such as sliding chair. Fades will be automatically adjusted. Access Fill mode by moving the switch all the way to the right.
11. Density – This defines your timeline density. From Sparse with just a few basic events covered all the way up to Crowded and Jammed.
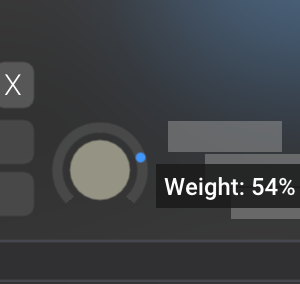
12. Weight Knob – Unique control allows you to focus on specific sounds based on their weight – heavy on the left or light on the right.
13. Timeline – This is a multitrack view of your sketch as it is arranged on the timeline.
14. Drag and Drop – Click and drag the corresponding button to import generated sounds directly into your DAW or NLE. Clips will import timestamped individual audio files whereas Groups will import a multitrack arrangement of non-overlapping sounds.
15. Clip List – Displays Clip Name, Position and Duration. Click to preview sounds (polyphonically too). Press Space on your keyboard to stop playback.
Steps to
create a sketch
1. Go to Extract Events, select your video and click Analyze.
2. Select the newly created Events file from the drop down menu.
3. Select a Sound Effects Library from the next drop down menu. [Fundamentals] is included with the software.
4. Make sure your Start timecode in Setup – Project matches the start of your video clip on your timeline.
5. Click Generate Sketch.
6. Once finished, the Groups button will turn purple. Drag and drop it into your DAW timeline. If your software supports timestamped audio, you can automatically sync clips to embedded timecode (such as using the Spot tool in Pro Tools).
Customizing
a sketch
Density
Adjust the Density slider to increase or decrease the number of sounds that will be synced with your video. The available options are Sparse, Moderate, Dense, Crowded and Jammed.
Length
Adjust the Length slider to select your average sound duration. The available options are Micro, Tiny, Short, Medium and Long.
Weight
Adjust the Weight knob to focus on specific types of sounds: booms and heavy rumbles all the way to the left, crickets and paper rustle all the way to the right, and everything in between. In the hard center position this knob is bypassed and the algorithm has the freedom to pick both heavy and light sounds.
Keywords
Type in a short scene description or enter a few keywords into the text field above the Generate Sketch button to narrow down your search. This will inspect the available Broadcast Wave metadata of your audio.
Expanding your
Sonic Palette
Alloy Mode
Switch to Alloy mode. This is a novel algorithm that will create new sounds based on features extracted from other sounds in your library.
Importing Your Own SFX Libraries
To add more sounds go to Setup – Sounds and click Add to select a folder containing your sound effects library.
Effects
Go to Setup – Processing – Effects parameters to adjust the intensity of your pitch and frequency shift effects, convolution reverb and reverse probability.
I. Events
Events are specific points in your video sequence that could benefit from the addition of sound effects. Sonic Alchemist provides three methods for generating Events:
AI Video Event Detection
Go to Extract Events and click Browse… to select your video. Click Analyze. Sonic Alchemist will automatically analyze the file and identify potential sync points.
Import Sync Points
Import precise synchronization points from a Pro Tools Session Info text file or Nuendo CSV marker track. The procedure is exactly the same as importing a video. Sonic Alchemist will automatically recognize if a file contains valid markers from your DAW.
Tip: When you create your marker track in Pro Tools, put a marker at the start of your video and label it “START”. Sonic Alchemist will automatically interpret it as the beginning of your sequence.
Blank Slate Mode
Select [ Blank Slate ] from your Events dropdown menu and let Sonic Alchemist generate sync points on its own, providing a blank canvas for your creativity.
II. Materials
Sonic Alchemist comes with a helpful audio materials library to get you started. Its true strength, however, lies in its ability to extract details from your existing sound effects libraries. The more material it has to work with, the more diverse and unique the results will be. You can access the built-in library by selecting [Fundamentals] from the Materials dropdown menu. To add more libraries, go to Setup and select the Sounds tab. Click Add… to select a folder. The smart scanner will extract a variety of sound properties from your WAV files such as weight, contrast, length, intensity, gravity and metadata. The algorithm analyses the actual structure of your sounds and identifies many features besides BWF metadata such as keywords and text description.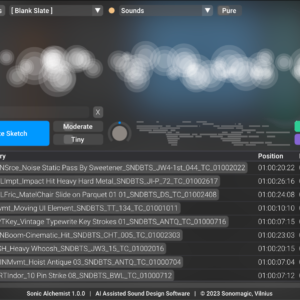
III. Sketch
Once you have made your Events and Materials selections from the drop-downs at the top of the window, you are ready to create a sketch.
Click the Generate Sketch button. Sonic Alchemist will automatically collect, trim, process, fade, synchronize, and timestamp sound effects to match your Events. This will create a new project folder containing a series of timestamped Broadcast WAV files in the “Clips” subfolder. You can automatically sync them to timecode if your software supports this option. By default, Sonic Alchemist will also group non-overlapping sounds and produce a complete multitrack sequence in the “Groups” subfolder. It can be dragged and dropped into any DAW or NLE by clicking and dragging the “Groups” button. This is the preferred method for Pro Tools. You can use a Strip Silence function in your DAW to remove silent parts and restore individual clips. If you wish to stop the sketch generation process, simply press the “Esc” key on your keyboard. Once your sketch is complete, you can listen to individual sound samples by clicking their names in the list box. You may preview multiple sounds at the same time, allowing you to get a sense of your overall sound palette.
IV. Alloy Mode
By choosing between Pure and Alloy modes, you can either maintain the integrity of your existing sound effects library or explore new sonic possibilities with the creation of novel sounds.
Pure Mode
In Pure mode, when all processing sliders are set to 0, Sonic Alchemist directly extracts portions from your original audio files without applying any processing. In this mode, the resulting sounds are true-to-source sections of your audio files. You can engage the processing sliders to apply a variety of effects, including pitch shift, reverse, convolution reverb, and frequency shifter.
Alloy Mode
Alloy mode features an innovative algorithm that generates entirely new sounds not found in your library. By analyzing the characteristics present in your sound effects library, the algorithm creates unique sounds by blending and combining various features. This mode expands your sound palette, providing you with an almost limitless source of original sounds even when working with a limited set of audio files.
V. Focus
The Weight Knob
The Weight Knob is a distinctive feature in Sonic Alchemist that uses a specialized algorithm to prioritize sounds based on their weight. At the center position (Neutral), the knob selects sounds of all weights. Rotating the knob to the left emphasizes heavier sounds (e.g., thumps, car passes, impacts), with the far-left position concentrating on the most substantial sounds (e.g., booms, explosions, rumbles). Rotating the knob to the right highlights lighter sounds (e.g., dragging objects, small props), with the far-right position targeting the most delicate sounds (e.g., flying insects, pouring grain, sand). To further customize your sounds, Sonic Alchemist provides additional options to adjust the focus of your sound design:
Event Density Slider
Located to the right of the “Generate Sketch” button, this slider allows you to set the Event density (Sparse, Moderate, Dense, Crowded, Jammed). A Sparse setting will focus on the main sync points, while a Jammed setting will fill your scene with multiple layers of sounds.
Sound Length Slider
This slider lets you adjust the length of the generated sounds, with options ranging from Micro (very short) to Long.

VI. Effects
Sonic Alchemist features an array of built-in effects, drawing inspiration from analog modular synthesizers and live performance techniques. To access these effects, go to Setup and switch to the Processing tab. You can control the effects using three sliders:
Pitch and Frequency Shift
This slider, ranging from 0 to 100, adjusts pitch deviation and frequency shifting. From 0 to 50, it alters pitch deviation (up to two octaves). From 50 to 100, it activates the frequency shifter, generating more resonant, sci-fi tones.
Convolution Reverb
This slider enables a high-quality impulse reverb to add depth to your sounds. When set to 100 (far-right position), the signal becomes fully wet.
Reverse Probability
Use this slider to determine the likelihood of a sound being reversed. At a setting of 50, half of your sounds will be reversed, while at 100, all sounds will be reversed.
Tips
Sonic Alchemist is all about experimenting, so don’t be afraid to mix and match options in your project. For example, you could try a few passes with Events extracted from your video file, each time using different materials like MOTION (think whooshes) or DETAIL (props or foley, and so on). Then, go ahead and generate another pass, this time using precise markers imported from your DAW, using a completely different set of materials, like IMPACTS for instance. You can even generate another pass with more intense drones or tones, using the Blank Slate mode. Now, bring all these elements together in your DAW project and take a listen.
Philosophy
In the beginner’s mind there are many possibilities, in the expert’s there are few. – Shunryo Suzuki
